Lotus and Isuzu owners seem to have their unfair share of faulty
sensors, the well known
`Cam angle sensor` problem is feared amongst owners everywhere,
the great expense and
time and lack of performance for this rather unassuming little
sensor makes for many a large
credit card or overdraft.. But never fear I have taken the
bull by the horns and it'll cost you
around $0.00 or in English money 0.00ukp (
given you've got the necessary tools, or can
borrow them )..
Ok first off can you answer yes to most of these questions..
1.YouI fraudulently went to another lotus dealer in your area, and not the usual one
and
pretended to be giving them your business, with the sole intent of getting them to
plug in
there little ALDL (Assembly Line Diagnostic Link) and get them to tell you the
code.
(type 41)
or
1a. I stuck a paperclip between two pins of the ALDL and counted the little flashing
lights on the instrument panel. As per the Lotus FAQ. (type 41) 4 flashes a pause
then 1
flash.
2. The performance of your elan is like a bunny rabbit, still quite fast but hops like
a
f rog on LSD, and the Eastbourne ZimmerFrame relay team can overtake you.
3. Can't rev above 4000rpm (reported by some owners, doesn't always apply,
didn't in my
case)
4. When idling the RPM doesn't stay at a constant 1000rpm (it ought too, the EM
should
make it) it oscillates.
If you answered yes to most of these, chances are your CAS is out, especially given
No
1. or 1a, what to do in these circumstances..
1. Go to your local lotus dealer pay $210.00 + labour charges for approx 1 and
1/2
hours (probably around $60-$100 per hour)
2. Go to your local Isuzu parts dept. and try and persuade them that it really is
an
Isuzu part and they do have it. (Good Luck)
3. Buy the expensive ($200) parts manual for the Elan and spend an evening
trying to
find the exploded diagram of the CAS assembly and be unable to
find it anywhere, clue: Its not there!
4. Fix it yourself.
If you choose 4 i`d suggest the following, Do you know the difference between a car
engine and a strange lump of metal and rubber that sits in the front of your car. If so
gather the following
A soldering iron (around 15watts small tip), yes that's how you spell it
Solder, small gauge will be fine , I use 60% tin , 40% lead, rosin core "44"
Brains.
A 5.5 mm ratchet socket
Some rubber sealant, or other sealing compound !must be non corrosive to copper and
etch board, as well as non conductive, + be heat resistant and capable of hermetic
sealing. I used some loctite black adhesive sealant that I used for putting back the
little panels on the door. I don't know if this is non corrosive to be honest, it has
some
acid in it, i`ll have to wait and see. YMMV..
Some contact cleaner, again non corrosive, no residue leaving etc. get it at frys.
A small stiff hog hair brush, not a metal bristle type.. again get it at frys, next to
the contact cleaner.
A friend who knows how to use a telephone and call the emergency services ..
Exacto knife
Small vice (not that kind)
About 1-2 hours..
A broken lotus,. or Isuzu impulse 4ex1
Note: About the battery, car batteries can supply a fair amount
of amperage at 12volts,
enough to do some serious harm to you, at least its DC though, you
probably should
remove the correct lead from the battery, see owners manual, before
attempting any
work. Be warned though that this can throw off your cars computer, it might
get rid
of all the information the computer has learnt about your engine/fuel mix etc.
Sometimes
that can be a good thing, depending, it'll take sometime to relearn it, .. I
didn't remove
the battery, that way i didn't have to worry about clearing the computers
memory, the
sensors aren't under power when the engine is of, (as far as I know), so they
won`t
get damaged. However its safer to work with the electrical system dead, even when
the engines off theres still juice running around. Be careful, use good
judgement..
The Procedure
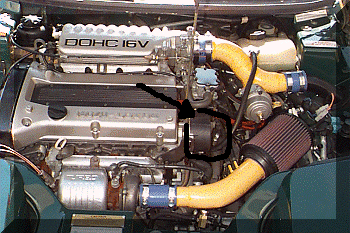
Firstly pop the hood, its better if you do it when the engines cold,
the EGR pipe
gets very hot and it just happens to be about 1-2 inches away from where your
fingers will be, wear gloves, engine compartments are carcinogenic ;-) .. See
the diagram in the car for which is the EGR.
This is Doug`s car , I pinched the picture from http://www.topendperf.com
I've drawn a
box around the plastic housing.. Remove that.. Isn't
dougs car cool with the colour coding..
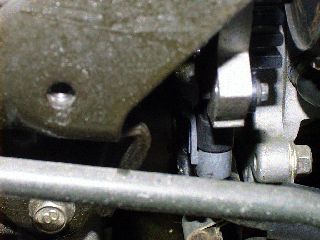
Locate the Sensor housing, stand in front of the engine, look at the
big shiny thing
that says ISUZU-LOTUS, to the right of that (the cam cover) there's a
black plastic
cover, its got a round extrusion coming out of it, and at the back of it
there's an
electrical connector, above it is a little metal box, ignore that.
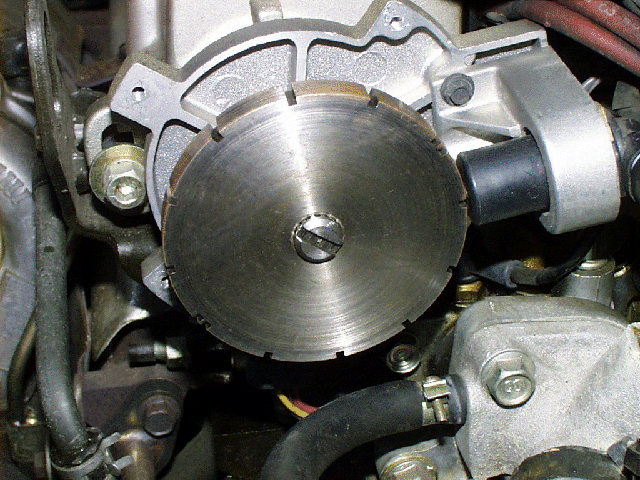
See it here below , these pictures are pretty big, but i thought its better that way so
you're
sure! Its the thing in the center of the picture.

Pretty messy huh.. Look at all that oil
Ok there are 4 bolts that 3 of are easy to get out, the other
is a little tricky, I picked up a ratchet
that could bend to get to it. Take your time
with it, don't strip it. Its slightly rounded so you can use
a closed head spanner/wrench
to wiggle it free.
Remove the plastic cover, You ought to see a large round disc with
cuts laterally across it, if not
put every thing back to the way it was and look for the
right cover dummy.. You'll see a black
plastic thing pointing down at the disc. This is
the other part of the sensor, I think its a timing/position
sensor, given the cuts.
Under and behind the disc is another black plastic sensor, it has
three little plastic extrusions,
and if you look at the metal disc, you'll see a metal
flange coming out of back, this passes
through that sensor and tells the computer when
each turn of the CAM happens, its a
hall-effect sensor, a little magnet and pickup inside
those extrusions..
Its not the one pictured above, the one
that points at the edge of the disc..
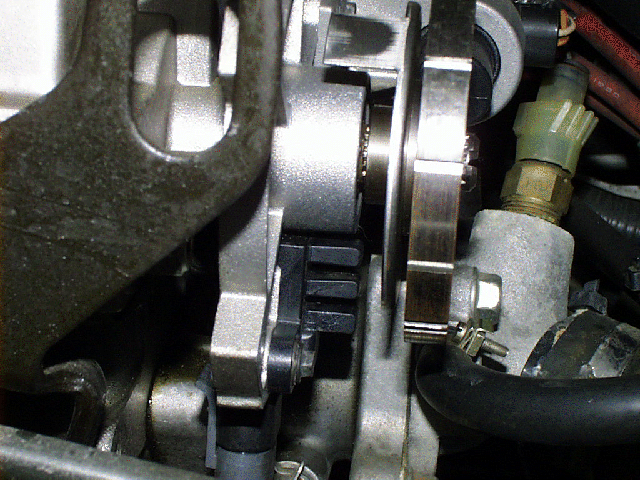
Heres the side view of the hall effect sensor. You can see one of the bolts clearly..
Here are some pictures of it after its been removed..
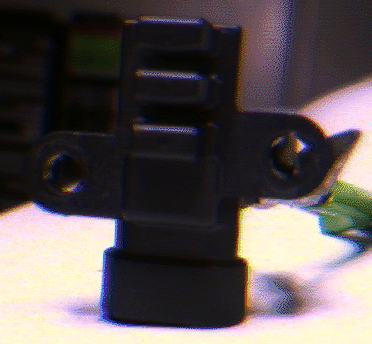
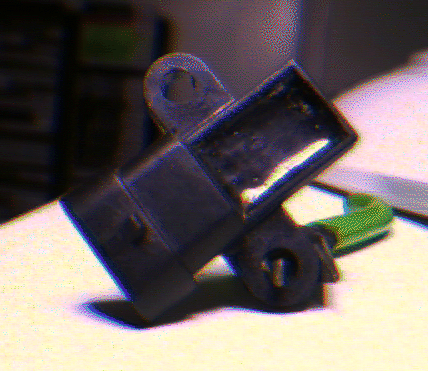
Sorry the pictures are A) a bit dim and B) out of the engine
8-) I used my
IndyCam and i`ll be damned if I'm dragging my SGI out to the garage to take
pictures of it )
You can just make out the three extrusions.. But we're jumping ahead
a
little here, ( and here's one I made earlier ).
Ok locate the above sensor, there are two bolts holding it in place,
ones easy the
others quite tricky to get out, a little patience and small hands works
wonders here,
so does a bendy ratchet. Get one of those bendy gripper things to retrieve
things
that have fallen into the engine, very useful , frys again. Pull out the connector
from
under the sensor, its locked in place by a tab, lift the tab away from the sensor
gently, its just plastic and although quite strong, it could snap and you don't want
that
do you..
Heres a side view showing the clip, its the grey thin tab that goes up the
black part.
Thats the EGR pipe in front, watch out for it.
Insert a screwdriver between the tab and the sensor and twist
gently, pulling
downward on the connector and *not* the wires going into it, these wires
are
not that strong and the connector can be pulled apart easily, so use the plug housing.
After you've removed the two bolts and the connector you should be able to lift
the sensor
away, note where it is before you do that, you may even want to mark it
with a white pen
or tippex/correction fluid before you even unscrew it,. it doesn't
matter if you don't but
it may help later (just be careful not wipe off the mark
as you handle it)
Ok the sensor itself is probably not that ESD sensitive, that's tech
talk for
static electricity, if you're one of those people who blow up electronic devices
just be looking at them hold onto the engine as you lift it out, take off your gloves
first, don't hold on to the EGR or any other hot part, and
make sure its metal, and
don't wear gloves for that part !!. This will discharge you of
any static buildup. I
doubt you could destroy the sensor short of running it up and down a
van der
graaf generator, but might as well take care..
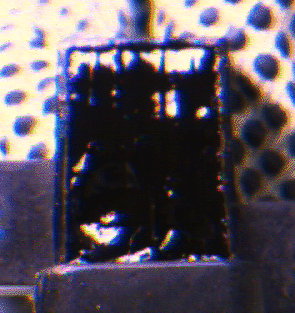
Next you'll see the shiny black compound on the sensor, its fairly
soft to the
touch, now *very* gently get a sharp exacto knife and cut around the outside
of the rubber stuff, don't cut too deeply yet, do it just
under half as deep as
the sensor, (approx 2.5-3mm) , at the end of the sensor that's not
where the
connector is you can cut all the way to the bottom, there's no wires or
circuits,
don't go mad though! the circuit board comes down about 7mm from the
connector
end so take a lot of care in that area, here's a picture of it..
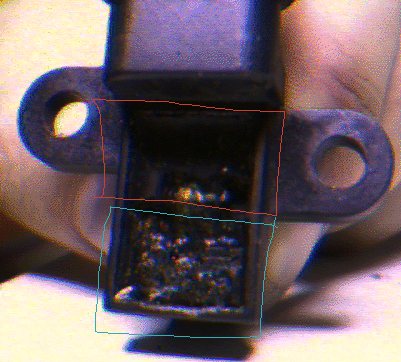
Unfortunately not a great picture, but you can see it I hope... I've
marked the red area as where the circuit board is, take extra care
here and do a little at
a time. The blue area is just rubber compound,
don't go too deep though the magnet is in
the extruded part, if you
don't go deeper than the shallowest part you'll be ok. Remove
the
rubber a bit at a time, It takes a little work but its quite doable...
You run the risk of cutting up the circuit board which is fairly delicate
so be careful around it..
Once you've removed as much of the rubber as you can spray it with
the contact cleaner and brush it with the hog brush to get rid of any residue,
clean iit
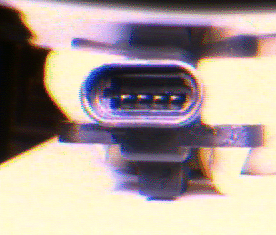
as much as possible especially around the pins at the top end.
(there are four in a row,
one doesn't have any solder on it), the rubber
will interfere with
the soldering process, so be sure to make it clean, don`t
rub
so hard that you scratch off the resin coating.
Once its nice and clean.
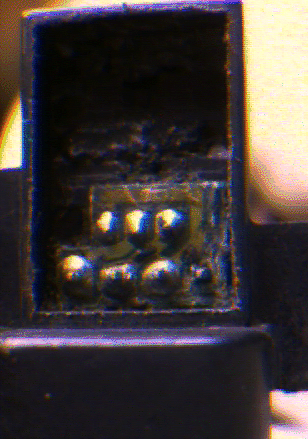
You can see the pins i was talking about, yes I know they
are at the
bottom in this picture.. who knew.. not that it matters.
in this case. You can see I
scratched the circuit board a little at the
top edge, oops if you want to be really safe
get some resin from frys
and paint it over, if you do that, it will protect the board (
don't do it
until the end though, just before applying the rubber compound ).
Ok next get the soldering iron, a small 15-20watt iron will do fine,
with a small bit, don't use one of those solder guns or a welding torch..
You're not arc
welding here. We then cover the tip of the soldering iron
with some solder or flux,
depending on how old you are, don't go mad,
if it beads its too
much, start again.
Get the tip of the iron nice and shiny, if its dull clean it on a
wet
sponge and try again, touch the iron to each of the solder pads (the
little silver
blobs) and wait for the solder to melt, it'll go brighter.
Now this takes practice, but
look for a pin that doesn't look quite
right, usually when soldered joints go bad, (dry
joints), you'll see a
change in the solder at the point where the pin comes from the
middle of the solder blob, the one on the leftmost at the bottom
is the bad one for me,
you can't see it too well in the pic, but its
visibly different from the others, it looks
disjointed, and it is.
Now to get rid of that you must get the solder to adhere to it,
usually this means getting it hot enough to join, a second or so
from a 15 watt iron will
do, a higher wattage iron requires less
time, add a little fresh solder to the joint and
it ought to flux together, ..
If you really want to do a good job get a solder sucker from frys
or
any electronics store, its a mini suction pump, you melt the solder
on the joint , put the
solder sucker on it and press the button and it
sucks out the solder, leaving a nice clean
pad, it might take you a
few tries.
Then resolder the joints, do all of them ,
take more care with
the 3 smaller ones, you could damage them with excessive heat,
again take your time.. it'll be fine.
As a tip practice soldering on your new computer, just kidding!!,
just get a couple of small SWG wire strands and solder them
together, practice till you
can control the amount of solder.
Don't join the pads together that's a no no make sure there's 6
visibly
separate pads, check very carefully with a magnifying glass after you've
done all
of them, look for solder that's gone across the joints,. remove
if there is any..
Ok you can apply resin to the board if you so wish now...its not
needed really , unless you've heavily scratched the board, it will protect
it and make it
last longer, let it dry though..

See how nice and shiny the joints are now! this is what
yours ought
to look like ...(its shinier in real life)
Replace the sensor in the engine, take your time with the screws.
try
and line the sensor up with where it was before, now see that metal plate
sticking out
of the metal disc , that has to pass through the top slot, so
what you have to do (when
you're reasonably sure its in the right place)
is first make sure you're not on a hill, put the handbrake on ( if you're
American, you probably haven't got
it on already ;-) ) put the engine
in gear (1rst) and take the brake off, again make sure
the car is on a
flat surface before doing this, its wise to have someone else around
who
isn't involved to call 911 if you let the car run over you..
Watch where the metal flange is. Rock the car gently forward, don't
let it roll back otherwise the cam will move forward then back, the idea
is to get it to
go forward very slowly, its quite heavy, do it gently though,
small steps, get the metal
flange as close to the sensor as possible make
sure its going to be able to pass through
the top slot, not the bottom one
as this does nothing.. when you're sure roll the car
forward an inch or so,
the metal flange should go into the slot, if there's a scraping
noise and little
bits of plastic, call your local lotus dealer, ok check the clearance
between
the slot and the flange, it should be even on both sides, if so, roll the car
forward again and check the clearance as it leaves the slot, not the car the
flange) if
its not clear adjust the sensor so that it is,,
Ok now when you're completely happy with the position of the sensor
,
you may want to push the car around a bit before this, tighten up the bolts
on the
sensor so they're nice and snug not to much or you'll distort the sensor
and/or crack it. Make sure the sensor doesn't shift position, check the
clearance
again...
If alls ok, put the brake on, take the car out of gear into neutral,
and give
the starter a quick turn, don't let the engine start just give it a quick twist
and
let go, If you lean through the window you can keep an eye on the sensor,
for gods sake make sure the car is out of gear and the brake is on before
you do this...
Ok check the flange , is there any plastic bits on it, no ,
then good, if
there are and its just a little chances are the clearance is slightly off,
adjust as before.
Ok start the engine, go round the front and watch the cam with
your
eyes and not your hands , stay away from it, its metal, sharp and spins
fast, you
need those fingers!. There shouldn't be any scraping or other
noises.. Go check the
instrument panel , the engine warning light ought to
be on, if it isn't you either jumped
ahead or you're doing the wrong sensor..
Turn the engine off, be careful of the EGR again,
even a short engine run
will heat it up..
Connect the sensor plug again, its dangling below the sensor
hopefully,
unless you wrapped it round the cam wheel for safe keeping (don`t do
that). I
Its tough to get in tight, make sure it mates correctly and the little notch
gets seated
it should be a snug fit. You will have to push it quite a bit to get it in.
Ok again, take the usual precautions , switch on the engine,
hopefully
the engine warning light won't come on, if it does you've either got something
else wrong with the car, check the code, or the connector isn't plugged in
correctly, or
you botched the soldering job 8-) . Take it off again and
check the soldering, get someone
who knows how to solder this time..
or maybe the sensor is frizzed take it to the dealer
and get another
(unlikely), make sure the engine is off ...
Remove the sensor again , what!, get the rubber compound and cover
the
circuit, (after you've checked it all works of course), use a piece of card to
make a
nice flat surface, let the compound cure, usually touch dry within 15
minutes, 1 hour till
its set enough to replace the sensor and 24 hours to
completely dry.
After the compound is applied, like the gloves?
Replace the sensor as before, taking time
to make sure its seated
correctly and the metal flange goes through the air
between the slot and not
the slot itself.
Reconnect the sensor plug, start the engine, if the light doesn't
come on hurrah
that's it , well done... Switch off the engine, replace the plastic cover
with all the
bolts!!, nice and tight and that's it. you've hopefully saved a few hundred
greenbacks.
I know I did...
If things aren't going well , backtrack, take your time check
everything, aligning
the sensor isn't that difficult just check and recheck, time spent
now will save money
later.
Remember: Check, Check agan and Recheck..
Engines and Camshafts spin at
very high speeds, they`re metal if they hit other surfaces
you could be showered
with little metal shards, not fun.
if you're stuck, don't understand this gibberish, drop me a line [email protected]
i`ll be happy to help, unless
you're asking me to pay for the damages you just
caused or medical bills etc ....
You might want to clean these pins too, use the cleaner from before and the brush
take care not to bend them.. cleaning them won't hurt, its a good
practice.
Have fun, mine worked great, saved $ 350 bucks, drove to the service center
and said
hey Ted cancel that part! I fixed it myself 8-) and with that I lowered
the hood and drove
off into the sunset with my dog molly, of course five minutes
later we stopped and put the
hood back up coz its freezing !!!
Did I forget anything, screws left over, unclear instructions then mail me -> [email protected] > abuse to [email protected]
. Charlie .